


Friday, May 8, 2009
MAPEXPORT in AutoCAD Civil 3D 2010
Hey everyone! Happy Friday! I don't know how many of you are using the Map 3D functionality in Civil 3D, but something has been brought to my attention this morning. If you use the MAPEXPORT command in Civil 3D 2010 to create an ESRI shape file, the shape file is empty. The Export Dialog box is missing the portion for you to where you select the object type. Selecting objects on the screen won't work because the object type has not been set. So, what do you do? Well, go here. This link will take you to the page to download a new MapExport.ini file and will give you the instructions on where to put the file to fix the dialog box.


Monday, May 4, 2009
Dragged State Labels
OK.....I'll be the first to admit that I am slow sometimes, mentally that is. This is something that I probably should have found a long time ago, but i stumbled upon it today. I was playing around with some Point Label Styles in AutoCAD Civil 3D 2010 today when I got to thinking about how I would really like to use a Stacked Text format for my dragged state, so that I could change the attachment point of my leader to the label. Then it dawned on me that I could create this style.
So, let's see how we would do just that. First, I created a point in my drawing. I did not change the default settings so when the point was created all I got was the point marker. Next I applied a Point Label Style to the point. the screen cap below shows my point style and point marker style.

Next, I clicked on the point to activate the grips and drug the label up and to the right of my point as shown below.
 From here, obviously, we need to edit the point label style. You can do this by clicking on the Settings tab in Toolspace and then expanding the Points node and then expanding the Label Styles node and then right-clicking on the style and selecting edit. Alternatively, you can right click on the point that you want to edit and in the Edit Points Vista, scroll to the right until you see the Point Label Style column. Clicking in the Point Label Style column will bring up the select label style dialog where you can edit the style by clicking on the button to the right of the style field.
So, let's see how we would do just that. First, I created a point in my drawing. I did not change the default settings so when the point was created all I got was the point marker. Next I applied a Point Label Style to the point. the screen cap below shows my point style and point marker style.

Next, I clicked on the point to activate the grips and drug the label up and to the right of my point as shown below.
 From here, obviously, we need to edit the point label style. You can do this by clicking on the Settings tab in Toolspace and then expanding the Points node and then expanding the Label Styles node and then right-clicking on the style and selecting edit. Alternatively, you can right click on the point that you want to edit and in the Edit Points Vista, scroll to the right until you see the Point Label Style column. Clicking in the Point Label Style column will bring up the select label style dialog where you can edit the style by clicking on the button to the right of the style field.
So, we have obviously applied colors to the text components on the layout tab. But, as shown above the colors are changed to the "Byblock" default color for the Dragged State. Here we will click in the Text Contents field to bring up the Text Component Editor and we want to highlight the text in the right-hand side of the editor. Then we will click on the Format tab and set the color of the text.
 We want to do this for each of the components in our label style. Then we will click on the Dragged State tab and make sure that the Dragged State Component Display is set to Stacked Text.

The results of our point label style are shown below. This is what the Dragged state would look like if we had set the Dragged State Component Display to "As Composed" also.
 So, let's edit the point label style again. And this time on the Dragged State tab, let's change the attachment point of the leader to the Middle of the Top Line.

Click OK. You may have to regenerate the screen to see that the changes did take affect. You should be left with something that looks like the image below. Now, here are a couple of hints for those of you working with Label Styles. The steps above will work for any Dragged State. You may want to create a Right and Left dragged state if you want a different connection point for the leader depending on which side of the object you are dragging the label. Also, pay attention to the order in which your components are created in the label style. The Dragged State arranges the text components in the order in which they were created!
 We want to do this for each of the components in our label style. Then we will click on the Dragged State tab and make sure that the Dragged State Component Display is set to Stacked Text.
The results of our point label style are shown below. This is what the Dragged state would look like if we had set the Dragged State Component Display to "As Composed" also.
 So, let's edit the point label style again. And this time on the Dragged State tab, let's change the attachment point of the leader to the Middle of the Top Line.
Click OK. You may have to regenerate the screen to see that the changes did take affect. You should be left with something that looks like the image below.
 Now, here are a couple of hints for those of you working with Label Styles. The steps above will work for any Dragged State. You may want to create a Right and Left dragged state if you want a different connection point for the leader depending on which side of the object you are dragging the label. Also, pay attention to the order in which your components are created in the label style. The Dragged State arranges the text components in the order in which they were created!
Wednesday, April 22, 2009
The Joys of Parcels in AutoCAD Civil 3D 2010
Hey everyone! I had the pleasure of doing a "What's New in AutoCAD Civil 3D 2010" webcast this morning. I was pleased with the turnout, considering that this was my first attempt at this type of webcast. One thing that I was not so pleased with was the fact that I couldn't see the attendees. For what it is worth, I think that face time is better than computer time. But, with the state of things being what they are, we too are trying to be more frugal.
Anyway we discussed the new Ribbon Interface and the Contextual Ribbons that are exposed when you select a C3D object on the screen. We looked at the Quick Access Tool bar quickly and the and the Application Menu too. The meat of the presentation centered around the new design and analysis functionality that is included in C3D 2010.
I want to take a moment or two to talk about one of these features. Most of you that have met me know that my background in Civil Engineering is in subdivision design. I am not sure why I fell into that category, but it seemed that every consulting firm that I worked for put me into that position. Oh well.....what will be will be! So, for all of you subdivision folks out there, what was the missing link in lot layout using C3D? That's right frontage offsets!
C3D 2010 has you covered! Parcel layout is much better now with the addition of frontage setbacks and minimum widths for lots, as well as minimum and maximum depths as design criteria. The commands for laying out lots have been revamped a little also. In the past we have used the "Slide Angle - Create" command to create or lots with a particular angle at the ROW. This command has now been renamed to "Slide Line - Create." It is the same command, just renamed, as far as I can tell. The neat thing about the updates to Parcel creation is obviously the fact that we can specify a minimum lot width at an offset distance and a minimum width at the ROW. This is functionality that I have been looking for since I began using C3D 2006.
Keep an eye on the ALACAD website. A link to the recording of today's webcast should be posted in the next couple of weeks. While you are there check out the list of other upcoming webcasts for the 2010 products.
Now that my presentation is out of the way, I plan to be adding a few posts on C3D 2010 in the coming days.
Anyway we discussed the new Ribbon Interface and the Contextual Ribbons that are exposed when you select a C3D object on the screen. We looked at the Quick Access Tool bar quickly and the and the Application Menu too. The meat of the presentation centered around the new design and analysis functionality that is included in C3D 2010.
I want to take a moment or two to talk about one of these features. Most of you that have met me know that my background in Civil Engineering is in subdivision design. I am not sure why I fell into that category, but it seemed that every consulting firm that I worked for put me into that position. Oh well.....what will be will be! So, for all of you subdivision folks out there, what was the missing link in lot layout using C3D? That's right frontage offsets!
C3D 2010 has you covered! Parcel layout is much better now with the addition of frontage setbacks and minimum widths for lots, as well as minimum and maximum depths as design criteria. The commands for laying out lots have been revamped a little also. In the past we have used the "Slide Angle - Create" command to create or lots with a particular angle at the ROW. This command has now been renamed to "Slide Line - Create." It is the same command, just renamed, as far as I can tell. The neat thing about the updates to Parcel creation is obviously the fact that we can specify a minimum lot width at an offset distance and a minimum width at the ROW. This is functionality that I have been looking for since I began using C3D 2006.
Keep an eye on the ALACAD website. A link to the recording of today's webcast should be posted in the next couple of weeks. While you are there check out the list of other upcoming webcasts for the 2010 products.
Now that my presentation is out of the way, I plan to be adding a few posts on C3D 2010 in the coming days.
Monday, April 6, 2009
Rehab this Rehab that
Hey everyone. In this post I want to talk about something that a customer of mine ran into a while back using some of the rehabilitation sub-assemblies in AutoCAD Civil 3D 2009. The particular project was a widening and overlay job. So, we started looking at the available options. We put together our assembly and created the Corridor model along with our top and datum surfaces. Completing the process, we cut cross sections and created the section views.
Upon inspection of our cross section data we noticed something strange. The datum surface followed the points and links that we expected it to until it reached the inside of the widened section. Then it shot straight across the section to the inside edge of the widened section on the opposite side. This made for an area that the program considered a cut volume when we created our quantities.
I tired everything that I could think of to change the assembly and corridor properties to rid our cross sections of this cut area. Everything that I tried failed miserably. So, I posted a support request with Autodesk. I got a call on Friday of last week from the Support Technician on the case. He had found the answer to our problem. He started explaining a couple of things to me and then it happened, on of those "Eureka!!!!!" moments.
The solution was simple, but I am afraid we all tried to make it a lot harder than was necessary. All we had to do was go back to the surfaces tab in the Corridor Editor and add the Overlay Link to the datum surface, rebuilt the corridor and everything was depicted as it should have been.
I want to thank the folks at Autodesk for helping on this one. They did an outstanding job!
Upon inspection of our cross section data we noticed something strange. The datum surface followed the points and links that we expected it to until it reached the inside of the widened section. Then it shot straight across the section to the inside edge of the widened section on the opposite side. This made for an area that the program considered a cut volume when we created our quantities.
I tired everything that I could think of to change the assembly and corridor properties to rid our cross sections of this cut area. Everything that I tried failed miserably. So, I posted a support request with Autodesk. I got a call on Friday of last week from the Support Technician on the case. He had found the answer to our problem. He started explaining a couple of things to me and then it happened, on of those "Eureka!!!!!" moments.
The solution was simple, but I am afraid we all tried to make it a lot harder than was necessary. All we had to do was go back to the surfaces tab in the Corridor Editor and add the Overlay Link to the datum surface, rebuilt the corridor and everything was depicted as it should have been.
I want to thank the folks at Autodesk for helping on this one. They did an outstanding job!
Friday, March 13, 2009
Cross Sections and Volume Tables
In this post I want to spend a little time with cross sections and computing material and earthworks volumes from the cross sections. I have been using AutoCAD Civil 3D for quite a while now and I have to admit that what I am going to show you next is something that I have not used before, and frankly never thought to ask, "What does that do?" Let's assume that we have created our corridor model, you know existing ground surface, alignment, profile from surface, proposed profile, and assembly. In the process of creating the corridor we also created our Top and Datum surface from the corridor model. In turn we used the boundaries feature in the Corridor Properties dialog box and added boundaries to each of the surfaces at our daylight line.
Then we start to look at our corridor sections and we see something that just doesn't look right. For some reason out datum surface has jumped from the bottom of the subgrade at the edge of the travel way to the top of the back of curb and back down to the extended subgrade. As seen in this image, the datum surface is jumping all over the place.
 We know that this is not correct. So, how do we fix it? It just so happens that there is a very simple fix to this issue. All we have to do is open up the Corridor Properties and click on the Surfaces Tab. In the table showing our surface definitions we see that there is a column called Overhang. This column is the correction for the jump in the surface shown above. This is what I had been missing!
By clicking in the Overhang column for each surface, we can tell Civil 3D how to "correct" the jumps in our datum surface. By setting the Overhang for the Datum surface to Bottom Links, the software forces the surface along the bottom links of the assembly, something we probably thought was happening automatically. After setting the Overhang corrections, we simply rebuild the Corridor Model and the surfaces are updated. We can use the View/Edit Corridors Function to verify that the surface has been updated. This image shows the corrected Datum surface.
 Here we can see that the Datum surface more closely resembles how a contractor would construct our roadway with a 1 foot extension of the sub-base under our curb and gutter.Now lets talk about material and earthworks volumes based on our cross sections. We are going to assume that at this point that we have created our cross sections from the alignment associated with our corridor model and that we have created multiple cross section views on a D-size sheet. At this point we realize that we forgot to add the volume tables to our cross sections. Can we fix this rather easily? You bet we can.
First of all we have to go to the Sections pull-down menu and select Compute Materials. Make sure that you select the Alignment for which you have cut cross sections and the Sample Line Group for that particular alignment. This will bring up the Compute Materials dialog box. In the Compute materials dialog box there is a drop-down for Quantity Takeoff Criteria. It depends on the final output that I am looking for as to which criteria I select. In this instance we are going to select Material List.
 At this point I will edit the Material List Criteria to make sure that have the materials listed that I am interested in, such as Pave1, Pave2, Base and Sub-base. After setting the materials that I want I click on OK to close the Compute Materials dialog. Next I go back to the Sections menu and select Compute Materials again.
 I want to click on the Import another criteria. This will allow me to add additional criteria to the current materials list. Here I want to select Earthworks so that we can calculate the cut/fill volumes at each section.

Here I can set the cut/fill factors for the soil if I know what they are. Once I have added the Earthworks Criteria I click on OK to close the Edit Materials dialog box. Now I need to add the Volume Tables at each cross section. To add the tables, I am going to click on a grid line for one of the cross sections, then right-click and select Section View Group Properties.
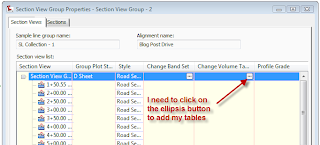
Click on the ellipsis button in the Change Volume Table column. This will bring up the Change Volume Tables dialog box. In this dialog box I want to select Total Volume from the Type drop-down. I want to select the Table style to use, in this case I am using the Basic Style. Click the Add button to add the table definition. Then I want to make sure that I select the corresponding Material List from the pull-down in the table definition. Then I can set the location of the table using the section view and table anchors.
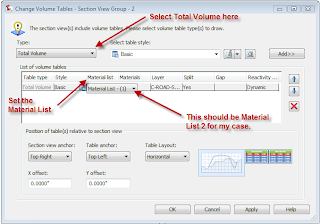 Then click on OK and you should have your volume tables attached to each of the cross sections. One caveat here is that when you add the Volume Tables to existing cross sections, you will probably have to go back and edit the spacing of your sections. So, you may have a little more work to do, but it is automated by editing the Section View Group and the Array on your Group Plot Style. Remember that you can create the Volume tables as you create the Cross Section Views, but you have to compute the materials before creating the views. Here is an image of a completed section with a volume table.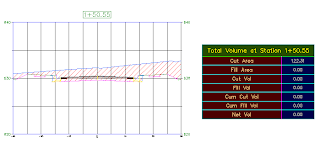
Friday, February 27, 2009
A Couple of New Tools and a Few Sub-assemblies
Hey everyone! If you are not on Subscription with your AutoCAD Civil 3D, you should be. In the last few months some great Civil 3D content has been posted to the Subscription Center. Of course, the only way you can get to the content is to be on subscription and log in to the Subscription Center.
Here are descriptions for a couple of extensions that were added to the Subscription Center. The first is HEC-RAS Extension for AutoCAD Civil 3D 2009. This extension loads into your toolbox and allows you to export Civil 3D data such as cross sections into The US Army Corps of Engineers HEC-RAS software. Once your analysis is completed in HEC-RAS you can import the data back into Civil 3D. For those of you out there that perform flood analysis, this is an excellent tool.
The second is the Stage-Storage Extension for AutoCAD Civil 3D 2009. This extension also loads into your tool box. This extension will calculate volumes for detention/retention facilities with a few mouse clicks! You can then create a table with the incremental and cumulative volumes and then plug that information into the Hydroflow Hydrographs Extension for pond calculations.
There were several sub-assemblies that were posted to the Subscription Center also. These sub-assemblies included a Conditional Cut/Fill sub-assembly and a Crowned Lane sub-assembly that allows for independent slope control on sub-base. This is something that people dealing with Mississippi State Aid Projects have been asking for.
Again all of this content is available only to subscription customers. So, if you are not on subscription and you think that this content could be helpful in your every day routine, contact your reseller to get your subscription started! If you are already on subscription log on to the Subscription Center and download the content!
Here are descriptions for a couple of extensions that were added to the Subscription Center. The first is HEC-RAS Extension for AutoCAD Civil 3D 2009. This extension loads into your toolbox and allows you to export Civil 3D data such as cross sections into The US Army Corps of Engineers HEC-RAS software. Once your analysis is completed in HEC-RAS you can import the data back into Civil 3D. For those of you out there that perform flood analysis, this is an excellent tool.
The second is the Stage-Storage Extension for AutoCAD Civil 3D 2009. This extension also loads into your tool box. This extension will calculate volumes for detention/retention facilities with a few mouse clicks! You can then create a table with the incremental and cumulative volumes and then plug that information into the Hydroflow Hydrographs Extension for pond calculations.
There were several sub-assemblies that were posted to the Subscription Center also. These sub-assemblies included a Conditional Cut/Fill sub-assembly and a Crowned Lane sub-assembly that allows for independent slope control on sub-base. This is something that people dealing with Mississippi State Aid Projects have been asking for.
Again all of this content is available only to subscription customers. So, if you are not on subscription and you think that this content could be helpful in your every day routine, contact your reseller to get your subscription started! If you are already on subscription log on to the Subscription Center and download the content!
Monday, February 16, 2009
It Will Be Here Before You Know it!
The cold of February is beginning to pass and a hint of spring warmth is in the air, at least in some parts of this great nation. I spent this past weekend on Alabama's Gulf Coast with several thousand revelers where the festivities known as Mardi Gras originated. No, Mardi Gras didn't begin in New Orleans, it began in the city of Mobile, AL in 1703!
Anyway, as we attended parades over the weekend and had as pleasant of weather as I can remember in the last few years, I couldn't help but feel a little bit of excitement about the onset of spring in the southeast. Spring in the southeast is great, as the days get longer, the fish start to bite better and work becomes filled with the anticipation of the next release of our beloved Autodesk Software products.
I can't talk a whole lot about the new features in Civil 3D yet, but I can talk about some of the new features in AutoCAD 2010, and since Civil 3D is based on AutoCAD............
One of the new features for AutoCAD 2010 deals with pdf's. Yes, we have been asking to be able to use pdf's as underlays in our drawings and with the next release it will be possible. There are some cool features pertaining to the creation and use of pdf's in this release.
Keep tuned for more info on AutoCAD 2010 and AutoCAD Civil 3D 2010!
Anyway, as we attended parades over the weekend and had as pleasant of weather as I can remember in the last few years, I couldn't help but feel a little bit of excitement about the onset of spring in the southeast. Spring in the southeast is great, as the days get longer, the fish start to bite better and work becomes filled with the anticipation of the next release of our beloved Autodesk Software products.
I can't talk a whole lot about the new features in Civil 3D yet, but I can talk about some of the new features in AutoCAD 2010, and since Civil 3D is based on AutoCAD............
One of the new features for AutoCAD 2010 deals with pdf's. Yes, we have been asking to be able to use pdf's as underlays in our drawings and with the next release it will be possible. There are some cool features pertaining to the creation and use of pdf's in this release.
Keep tuned for more info on AutoCAD 2010 and AutoCAD Civil 3D 2010!
Subscribe to:
Posts (Atom)