After we click OK, the Weed Vertices dialog box will appear. We will accept the default settings for now. Now we will create the temporary surface. Click on the Grading menu at the top of the screen and select "Create Grading." This will activate the Grading Creation Tools Toolbar. On the Grading Creation Tools Toolbar we will select the leftmost icon. This is the Create Grading Group icon. The Create Grading Group dialog box will appear.
In the Create grading dialog box we will type in the name "Temporary Surface." Next, select the Automatic Surface Creation check box, select the Use the Group Name check box and change the surface style if you want to. Finally, we will click OK to create the Grading Group and click OK to create the surface.
On the Grading Creation Tools Toolbar we will set the grading criteria to "Grade to Distance." We will create two gradings here. First, select the feature line and select the right side as the side to grade to. Accept the default answer of "Yes" when prompted to apply to entire length. On the right side we will grade to a distance of 150 feet. When the command line prompts for a grade or slope, type in G for grade and hit enter. Use a grade of 3.00%. On the left side we will grade to a distance of 400 feet at a grade of -2.00%.
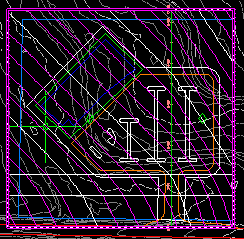 Your site should look similar to the image above. This concludes Part 2 of the Grading Short Course notes. Next time we will complete the grading of our site.
3 comments:
thanks for the nice notes
have you posted the practice files yet?
I have not posted the practice sets yet. I am still looking for a location to host them. This blog site will not allow any uploading/downloading of data. Hopefully I will be able to let you know something by the end of the week.
For those of you who are looking for the data set for the grading short course, you can find those on the Alacad ftp site. Type ftp.alacad.com into your web browser. Once connected to the ftp site Click on File from the menu and select Login As.....
the user name is guest and the password is alacad99. There is a folder called Grading Short Course that contains the files.
Post a Comment