Okay, let's finish this site. The first thing we need to do is create a new site. We will do this the same way we created the Temporary site in the Part 2 of these notes. We will change the name of this site to "Final Site."
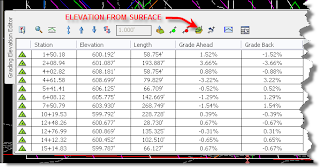
The Select Surface dialog box will appear. Select the Temporary Surface that we created in Part 2. You will notice that the elevation for each vertice is updated. If, by chance, your Temporary Surface does not encompass the feature line you will have some vertices that have a zero elevation. This can be fixed by assigning an elevation to those vertices in the elevation editor or you can use the "Set Grade/Slope Between Points" icon from the Feature Lines Toolbar. If you use the "Set Grade/Slope Between Points" command, you will be asked to select the starting point and elevation and the ending point and Grade/Slope/Elevation. (Just follow the prompts on the command line.)

Next, we will click on the Grading menu at the top of the screen and select "Create Feature Lines from Objects." Select the poly line that surrounds the parking lot and building pad. The Create Feature Lines dialog box will open. We want to make sure that our site is set to Final Site. If it is not, select it from the pull down menu. We will set the style of our feature line to Basic, and make sure that we are on the C-TOPO-FEAT layer. Select the feature line that we just created and right-click. Select "Elevation Editor." From the tool bar select the Elevations from Surface icon.
The Select Surface dialog box will appear. Select the Temporary Surface that we created in Part 2. You will notice that the elevation for each vertice is updated. If, by chance, your Temporary Surface does not encompass the feature line you will have some vertices that have a zero elevation. This can be fixed by assigning an elevation to those vertices in the elevation editor or you can use the "Set Grade/Slope Between Points" icon from the Feature Lines Toolbar. If you use the "Set Grade/Slope Between Points" command, you will be asked to select the starting point and elevation and the ending point and Grade/Slope/Elevation. (Just follow the prompts on the command line.)
Next we will select "Create Grading" from the Grading Menu. On the Grading Creation Tools Toolbar we are going to select the leftmost icon to set the grading group. In the Site Name pull down menu we will select our Final Site. Then to the right of the Grading Group Name pull down you will see two (2) icons. We will select the icon on the far right - the "Create Grading Group" icon. In the Create Grading Group dialog box enter the name of Parking, select the Automatic surface Creation box and select the Use the Group Name check box. Then click "OK."
Back on the Grading Creation Tools toolbar we want to select the "Set Surface" icon, second from left, and set the surface to EG. Next we will set the Grading Criteria to "Grade to Surface." you will be asked to select a feature line. Select the feature line to which we set the elevations from our Temporary Surface. When prompted to select a side to grade, pick outside of the feature line, i.e an area that is not inside the parking lot or building footprint. You will be prompted to apply the grading to the entire length. Enter "NO." When prompted for a starting point use your endpoint OSNAP to select the endpoint of the feature line on the right side of the driveway at the entrance to the site. When prompted for the end point select the endpoint on the west side of the driveway. Follow the prompts on the command line. If you desire to change the cut or fill slope go ahead. I used a 5:1 cut and a 6:1 fill slope in my example. The grading limits and proposed contours should be shown on the screen.
Go back to the Grading Menu and select "Create Infill." Pick a point inside the parking lot to create the infil. This should connect the contour lines accross the parking area.
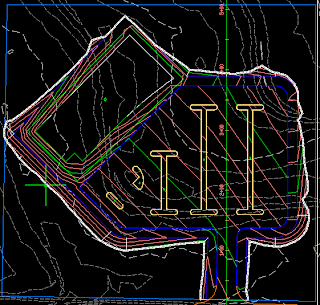
The screen capture above shows the site with the tie-in grading and infill grading through the parking lot.
Next, we will create feature lines from the outlines for the islands in the parking lot. Select one of the islands and right-click. Select "Select Similar" from the pop-up menu. Click on the Grading Menu and select "Create Feature Lines from Objects." In the Create Feature Lines dialog box set the style to "Bottom Curb," select the Erase Existing Entities check box and select the Assign Elevations check box. Click "OK." In the Assign Elevations dialog box change the surface to Parking and click OK. Click on the Grading Menu and select "Create Infill." click inside each island to create an infill for the islands.
A warning here... You will probably have to go back and create another infill for the parking area. When I stepped through this exercise, the centroid of the infill grading that I created after tying my parking surface into the EG suface fell inside one of my islands. That is not an issue, you may just have to create another infill for the rest of the parking lot.
Now let's click on the Grading menu and place our mouse over "Edit Feature Line Geometry." You should get a fly-out menu. Select "Stepped Offset" from that menu. We will now offset the curb feature lines to the inside a distance of 0.5 feet and an elevation difference of 0.5 feet.
We need to create a feature line from the polyline that represents the edge of pavement for the parking lot. When creating the feature line, assign elevations from the parking surface. Then using the same commands create an offest of the edge of pavement o.5 feet to the outside and o.5 feet elevation difference. This will create a curb around the parking area. The only step left is to create a feature line for the building and assign an elevation to it. Again, you may have to create another infill for the area bounded by the tie-in grading, the building pad and the back of the curb around the parking area. When you have completed these steps, you should have something that looks like this:
The only thing left to do here is create our detention facility. I am going to leave that to your imagination.
No comments:
Post a Comment